For a while, I suddenly became fascinated by the stories in the Old Testament. I often came across place names like “Babylon” and “Assyria” in the Bible, and while reading, it felt like these places were right next door. But in reality, I had absolutely no idea where they were. So I thought: What if I could find an ancient map and compare it to see where these stories took place? Wouldn’t that make the scenes come alive?
I got right to work, searching online for ancient Near East maps. But after looking at them, my head spun: too many letters, complex symbols, and crisscrossing lines—I couldn’t make heads or tails of it. It felt like staring at an abstract painting, completely lost.
But precisely because of this, I began seriously developing a method suitable for beginners. Next, I’ll share my own tips for learning ancient Near East maps.
Preparing Your Tools
First, I decided to start with the “equipment.” I found a high-resolution, clearly labeled ancient Near East map online and printed it on A3-sized paper for easier annotation.
Besides the map, I gathered a few essential study tools:
- A modern world atlas for comparing ancient and modern place names.
- Several colored highlighters and a regular pen for marking key points.
- An inexpensive notebook for jotting down insights.
- And of course, a cup of hot coffee to keep me alert during the long study session.
With these tools ready, I finally began my map exploration.
Step One: Locate Water Sources to Establish “Geographical Anchors”
When I first looked at the map, I was completely overwhelmed by the dense cluster of place names. So I decided to start with the simplest approach: finding water.
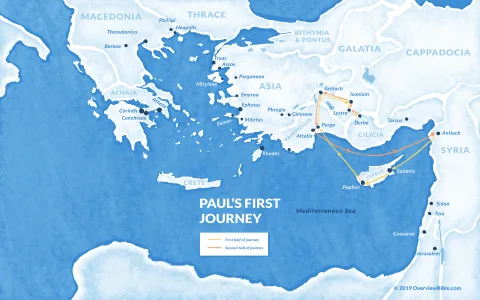
The two most prominent rivers on the map were labeled “Euphrates” and “Tigris.” This immediately made me realize that the land sandwiched between these two rivers was the historically renowned “Mesopotamia,” literally meaning “the land between two rivers.” .
Next, I spotted a large body of water on the left side of the map labeled “Mediterranean Sea.” Below and to the right of it lay another blue expanse marked “Red Sea.” Suddenly, my mind had a sense of direction. I highlighted the two major rivers with a yellow highlighter, circled the Mediterranean Sea in blue, and outlined the Red Sea in orange. This gave the map several clear “anchor points,” making it feel less unfamiliar.
Step Two: Mark Key Regions and Cities
Next, I began marking the important regions frequently mentioned in biblical stories.
- Egypt: This was easy to find, located near the Nile River basin. The map even included a pyramid icon. I marked the entire Nile River basin in green and wrote “Egypt.”
- Assyria and Babylon: Back in the Mesopotamian region, near the northern mountains, ‘Nineveh’ is labeled—the capital of the ancient Assyrian Empire. I circled this area in purple and labeled it “Assyria.” Near the Persian Gulf in the south is marked “Babylon,” the famous city of Babylon. I circled this area and wrote “Babylon.”
- Israel/Judah: This small area is sandwiched between the Mediterranean Sea and the Jordan River. The map marks “Jerusalem,” a crucial point. I outlined the entire region in red and wrote “Israel/Judah.”
Seeing Israel sandwiched between the two great powers of Egypt and Mesopotamia on the map, a new understanding suddenly dawned on me: no wonder this small land has been perpetually ravaged by war throughout history.
Step Three: Connect the Map to Biblical Stories
After marking these locations, the next step is to link the map with biblical stories for deeper impact.
- Abraham’s Journey: The Bible states Abraham came from “Ur.” I located this city on the map, situated south of Babylon. I drew an arrowed route: first northwest along the Euphrates River to Haran, then south into Canaan—today’s Israel.
- Exodus: The Israelites set out from the Nile Delta, crossed the desert to the Red Sea, and entered the Sinai Peninsula. I drew a winding route on the map and marked the entire Sinai Desert area in light brown.
- Babylonian Exile: After the fall of the Kingdom of Judah, many Jews were exiled to Babylon. I drew a straight arrow from Jerusalem pointing to Babylon, labeled “Exile.”
These routes bring biblical stories to life. Before, I only encountered terms like ‘Exodus’ or “Exile” in text. Now, tracing these journeys directly on a map feels like walking the same paths as historical figures.
Learning Insights: How to Memorize Maps More Effectively
Through this process, I realized trying to memorize every detail at once is unrealistic—especially for beginners, who might easily give up. So I’ve summarized a few tips that helped me most:
- Focus on Waterways First: Rivers and oceans are natural landmarks that never change, helping you quickly orient yourself.
- Lock Down Major Regions: Prioritize memorizing key regions like Egypt, Mesopotamia, and Israel; smaller areas can be added gradually.
- Select One or Two Classic Routes: For instance, Abraham’s migration path or the Exodus route. This infuses the map with narrative depth.
- Mark Boldly: Don’t hesitate to scribble on the map. Write important place names larger and use colors to distinguish them—this makes memorization stick.
- Embrace mistakes: Learning maps inherently involves trial and error. I initially misplaced Philistia several times, but timely corrections are key.
This approach transforms learning from rote memorization into an interactive, logical exploration.
Gains from Studying Maps
After days of study, I finally grasp biblical narratives more vividly. When I read “Pharaoh mustered his army,” the Nile Delta instantly appears in my mind. “Nebuchadnezzar took Israel captive” conjures arrows pointing from Jerusalem to Babylon. Mention of Jesus preaching in Galilee immediately locates the Sea of Galilee.
This geographical knowledge transforms the Bible from distant ancient tales into history unfolding on real land. For me, this experience feels remarkably fresh—like adding a layer of three-dimensional depth to the stories.
Summary: The Bridge from Maps to History
Studying ancient Near Eastern Old Testament maps isn’t tedious at all. With the right approach, it feels like piecing together a historical puzzle:
- Start with key geographical clues to build a clear framework;
- Focus on several key regions and cities, beginning with a broad understanding;
- Connect the story’s route to link the map with the characters’ experiences;
- Draw as you learn, using colors and annotations to bring the map to life;
- Practice patience and embrace trial and error—don’t fear initial mistakes; corrections are part of progress.
Learning maps this way is like watching a historical documentary with a backdrop of maps. You’ll discover that seemingly abstract place names actually represent real locations, and every story unfolds between specific lands and rivers.
If you’re also a fan of biblical history or interested in ancient Near Eastern cultures, why not grab some colored pens, prepare a map, and start piecing together this ancient world—beginning with finding water sources.