Alright folks, got a bunch of requests recently asking how to draw that iconic One Piece Jolly Roger. Thought it’d be easy-peasy, grabbed my sketchpad today to see for myself. Wanna share exactly how it went down, warts and all.
Gathering My Tools
Rushed straight to my desk, didn’t even finish my coffee. Just grabbed whatever was handy:
- A regular HB pencil (sharpened kinda wonky)
- My kid’s eraser (already covered in glitter… thanks)
- A crumpled piece of printer paper (backs of old bills work too!)
- My trusty black pen (the cheap kind)
Didn’t bother hunting for fancy stuff. Figured simple is best for this.
Starting With The Basic Shape
Took a deep breath. Started sketching a circle right smack in the middle. Didn’t stress about it being perfect. Honestly? It came out a bit egg-shaped first try. Whoops. Grabbed that glittery eraser and smudged it out – paper got a bit grubby, but whatever. Second attempt was… passable. More like a lumpy circle, but hey, good enough.
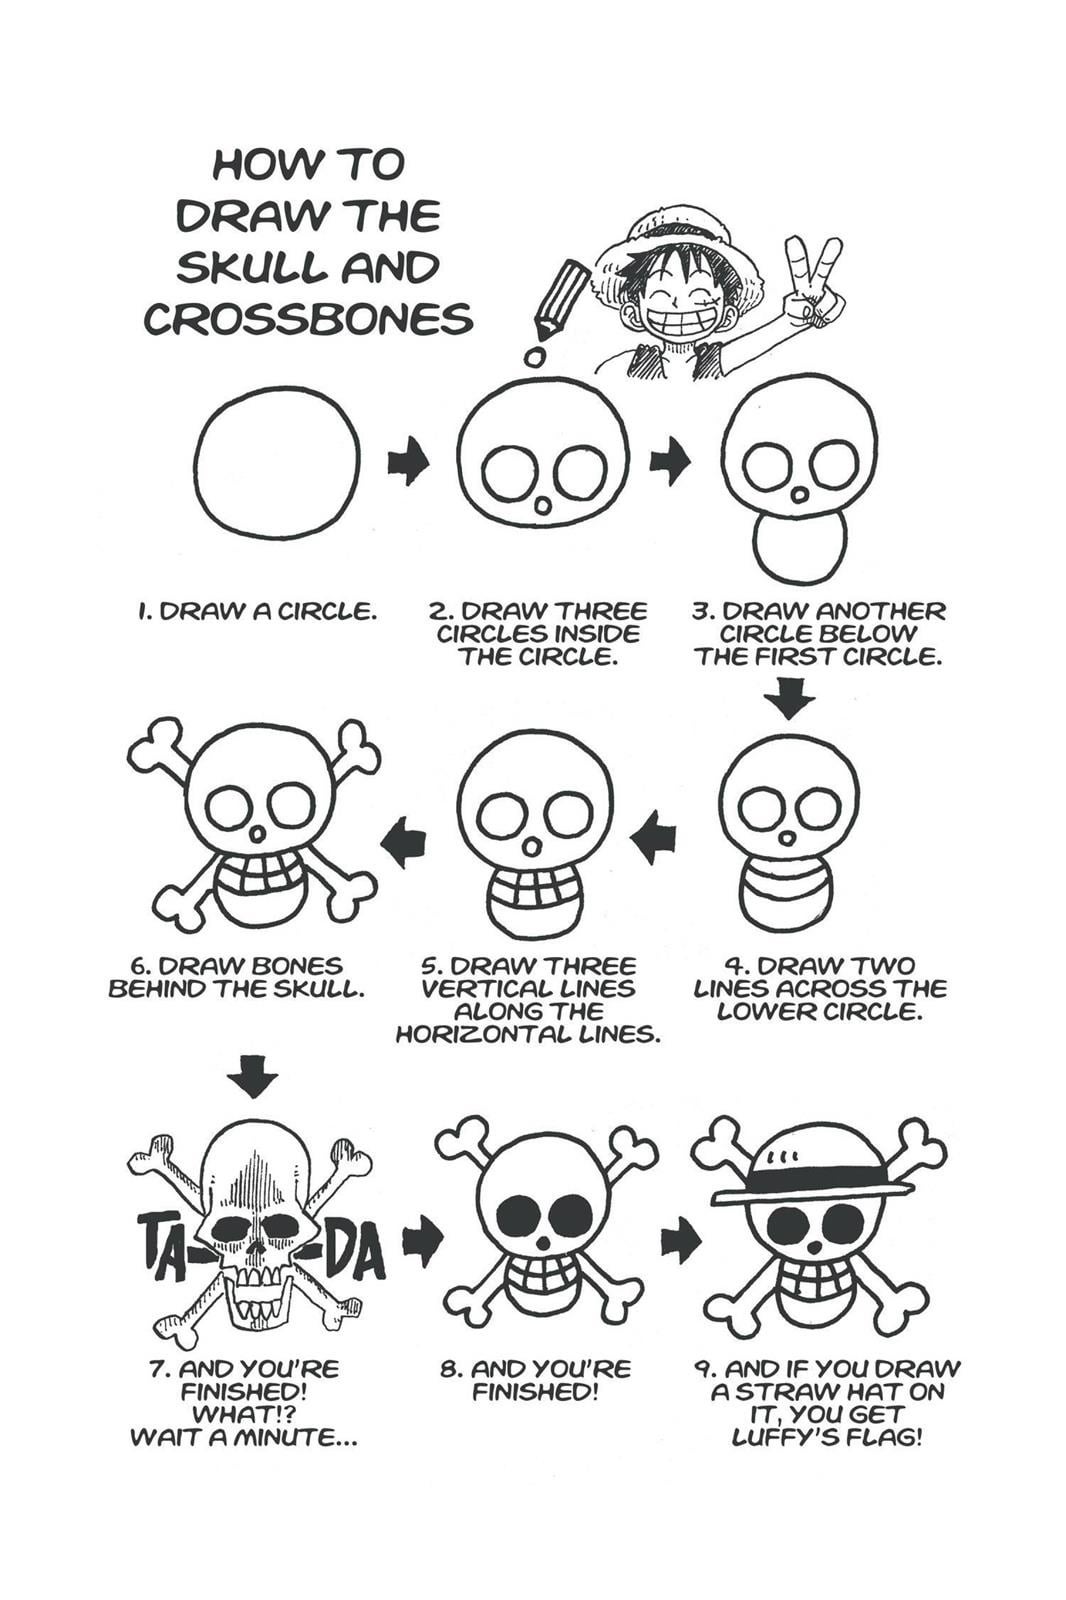
Then came the crosses. Needed two bones making that X behind the skull. Drew two longish lines crossing over my wonky circle. Tried making ’em thick like bones. First one looked more like a skinny noodle. Second try? Better. Made ’em chunky, flaring out a bit at the ends like fat bone knobs. This part actually felt smoother than the circle!
Tackling The Skull Details
Here’s where things got fiddly. The eye sockets first. Drew two big, kinda almond shapes. Placed them high up on the circle, like right under where the top crossbone touches the circle. Gotta make ’em look hollow and mean! Left a weird gap between the sockets – the nose bridge, I guess?
Next up, the nose hole. Just a simple upside-down triangle shape, right smack below those eye sockets, centered in that gap. Small and pointy. Drew it quick, felt straightforward.
The grin. Oh boy. Wanted that wide, creepy smile stretching almost ear-to-ear. Started drawing one long curved line below the nose hole. Didn’t curve enough. Looked too polite! Erased the glitter mess again. Second time, exaggerated the curve way up at the ends. Big, toothy gap underneath. That felt much better – properly menacing. Threw in some jagged lines along the grin for teeth. Didn’t count ’em, just made it look sharp and nasty.
Going Over & Touching Up
Okay, had my rough pencil sketch. Was sweating a little – my skull still looked kinda lopsided. Grabbed that cheap black pen. Time to trace over those pencil lines I liked. Pushed down firm for those thick bone lines. Took it slower around the skull shape and the face details, trying to smooth out the wobbles.
Once the ink dried (blew on it like I was cooling soup!), went ham with the eraser on all the leftover pencil marks and glitter specks. Looked a thousand times cleaner. Squinted at it. The eyes looked uneven? Touched up the left one with the pen to make it match the right.
My Final Result
It ain’t no Oda masterpiece, lemme tell ya! But you know what? After starting with that potato-shaped circle, I finally got something that screams “Straw Hat Pirates”. It’s got the crazy wide smile, the hollow eyes, the big crossbones – the essentials are all there. Looks kinda like it sailed through a storm, but hey, pirate ship life, right?
Biggest takeaway? Keep it simple, especially at first. Circles can be jerks, but just try again. Don’t sweat the tiny mistakes. Focus on the main shapes – that big grin, those thick bones, the hollow eyes. Those are what make it instantly recognizable. Honestly, after messing it up myself, I see why everyone asks now! Stick with it, you’ll nail it faster than I did.